Introduction
Welcome to your first step in the coding world!
If you're new to programming or looking to switch to a more efficient code editor, Visual Studio Code (VS Code) is an excellent choice.
Developed by Microsoft, VS Code is a free, open-source code editor that supports many programming languages and offers features to enhance your coding experience.
In this beginner's guide, we'll walk you through the steps to start with Visual Studio Code, from installation to writing your first piece of code.
Table of Contents
Why Choose Visual Studio Code?
System Requirements
Downloading and Installing VS Code
Understanding the User Interface
Customizing Your Workspace
Installing Extensions
Creating and Opening Projects
Basic Editing and Shortcuts
Running and Debugging Code
Additional Resources
Why Choose Visual Studio Code?
Free and Open-Source: No cost involved; a large community contributes to its development.
Cross-Platform: Available on Windows, macOS, and Linux.
Extensibility: Thousands of extensions to enhance functionality.
Intelligent Code Completion: Features like IntelliSense provide smart code suggestions.
Integrated Terminal: Access the command line without leaving the editor.
Git Integration: Manage version control directly within the editor.
System Requirements
Before installing VS Code, ensure your system meets the following requirements:
Windows
OS: Windows 7, 8, 10, or 11 (32-bit or 64-bit)
RAM: 1 GB minimum
Disk Space: 200 MB minimum
macOS
OS: macOS 10.11 (El Capitan) or later
RAM: 1 GB minimum
Disk Space: 200 MB minimum
Linux
OS: Ubuntu, Debian, Fedora, Red Hat, or other distributions
RAM: 1 GB minimum
Disk Space: 200 MB minimum
Downloading and Installing VS Code
Step 1: Visit the Official Website
Go to the
.
Step 2: Download the Installer
Click on the Download button.
The website should automatically detect your operating system.
Alternatively, select your OS manually.
Step 3: Run the Installer
Windows
Locate the downloaded .exe file.
Double-click to run the installer.
Follow the on-screen prompts.
macOS
Open the downloaded .dmg file.
Drag and drop the Visual Studio Code app into the Applications folder.
Linux
Download the appropriate package (.deb or .rpm) depending on your distribution.
Use the package manager to install, e.g., sudo dpkg -i filename.deb.
Understanding the User Interface
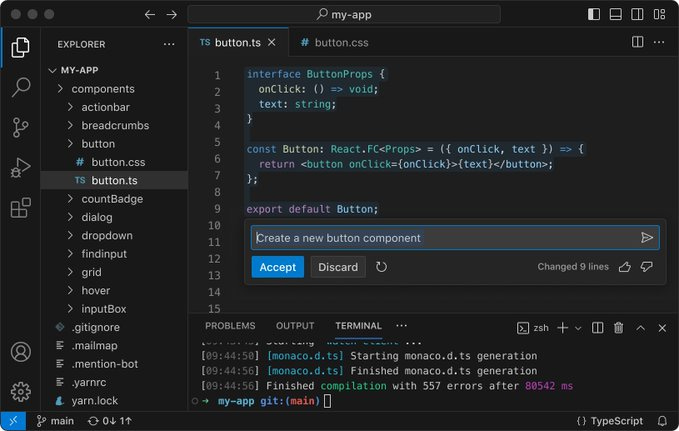
When you first open VS Code, you'll see several key components:
Image source:
Visual Studio Code Documentation
Activity Bar: The vertical bar on the left provides access to different views, such as Explorer, Search, Source Control, Run and Debug, and Extensions.
Side Bar: Displays different views and tools depending on the selected activity.
Editor: The main area where you'll write and edit code.
Status Bar: Located at the bottom, it shows information about the current file and tasks.
Panel: Contains output or debug information, terminals, and problems.
Customizing Your Workspace
Changing the Theme
Go to File> Preferences > Color Theme (Windows/Linux) or Code > Preferences > Color Theme (macOS).
Choose from the list of available themes.
Preview themes by hovering over them.
Adjusting Font Size
Navigate to File> Preferences > Settings.
Search for Font Size.
Adjust the value as per your preference.
Installing Extensions
Extensions add functionality to VS Code. Here's how to install them:
Step 1: Open the Extensions View
Click on the Extensions icon in the Activity Bar.
Or press Ctrl+Shift+X (Windows/Linux) or Cmd+Shift+X (macOS).
Step 2: Search for Extensions
Use the search bar to find specific extensions.
Popular extensions include Python, which is used for Python development; Prettier, a Code formatter; ESLint, which is used for JavaScript linting; and Live Server, Which Launches a local development server.
Step 3: Install an Extension
Click on the desired extension.
Click the Install button.
Creating and Opening Projects
Opening a Folder
Go to File> Open Folder.
Select the folder containing your project files.
Creating a New File
Click on File> New File.
Or press Ctrl+N (Windows/Linux) or Cmd+N (macOS).
Saving a File
Go to File> Save As.
Choose a location and File name.
Ensure the file extension matches the language (e.g., .py for Python).
Basic Editing and Shortcuts
Code Editing
Syntax Highlighting: VS Code automatically highlights syntax based on the file type.
IntelliSense: Provides code suggestions and auto-completions.
Useful Shortcuts
Command Palette: Ctrl+Shift+P (Windows/Linux) or Cmd+Shift+P (macOS).
Find and Replace: Ctrl+F and Ctrl+H (Windows/Linux) or Cmd+F and Cmd+H (macOS).
Go to Line: Ctrl+G (Windows/Linux) or Cmd+G (macOS).
Multi-Cursor Editing: Hold Alt (Windows/Linux) or Option (macOS) and click to add cursors.
Running and Debugging Code
Running Code
You can run code directly in VS Code for languages like Python or JavaScript.
Example: Running a Python Script
Install the Python Extension.
Write your code in a .py file.
Run the code by pressing F5 or selecting Run > Start Debugging.
Debugging
Set breakpoints by clicking next to the line numbers.
Use the Run and Debug view from the Activity Bar.
Control execution with Continue, Step Over, Step Into, and Step Out.
Additional Resources
Official Documentation:
Tutorials and Guides:
,
Community Support:
Conclusion
You've set up Visual Studio Code and are ready to start coding! As you become more comfortable, explore additional extensions and features to enhance your productivity. Remember, practice makes perfect; the more you code, the more proficient you'll become.
Happy coding!
Author:


